
| 일 | 월 | 화 | 수 | 목 | 금 | 토 |
|---|---|---|---|---|---|---|
| 1 | 2 | 3 | 4 | 5 | 6 | 7 |
| 8 | 9 | 10 | 11 | 12 | 13 | 14 |
| 15 | 16 | 17 | 18 | 19 | 20 | 21 |
| 22 | 23 | 24 | 25 | 26 | 27 | 28 |
| 29 | 30 | 31 |
- Bandit Level 5
- Law of Demeter
- 프로토타입 모형
- mysql 튜닝
- Bandit Level 6 → Level 7
- Bandit Level 6
- 에자일 모형
- plsql
- avax.net.ssl.SSLHandshakeException:
- 스크럼기법
- 시스템 파악
- java.sql.SQLRecoverableException
- 변수명 짓는법
- 나선형 모형
- 명령어공부
- 시스템 파악 정리
- springboot
- SQLRecoverableException
- OpenAPI
- vue
- 클린코드
- CSS
- 폭포수 모형
- table scan
- pl/sql
- was버그
- 디미터 법칙
- was SQLRecoverableException
- 커맨드공부
- 인증서만료에러
- Today
- Total
개발햄비
[java] springBoot + mybatis + mysql 게시판 환경설정(1) 본문
1. STS실행
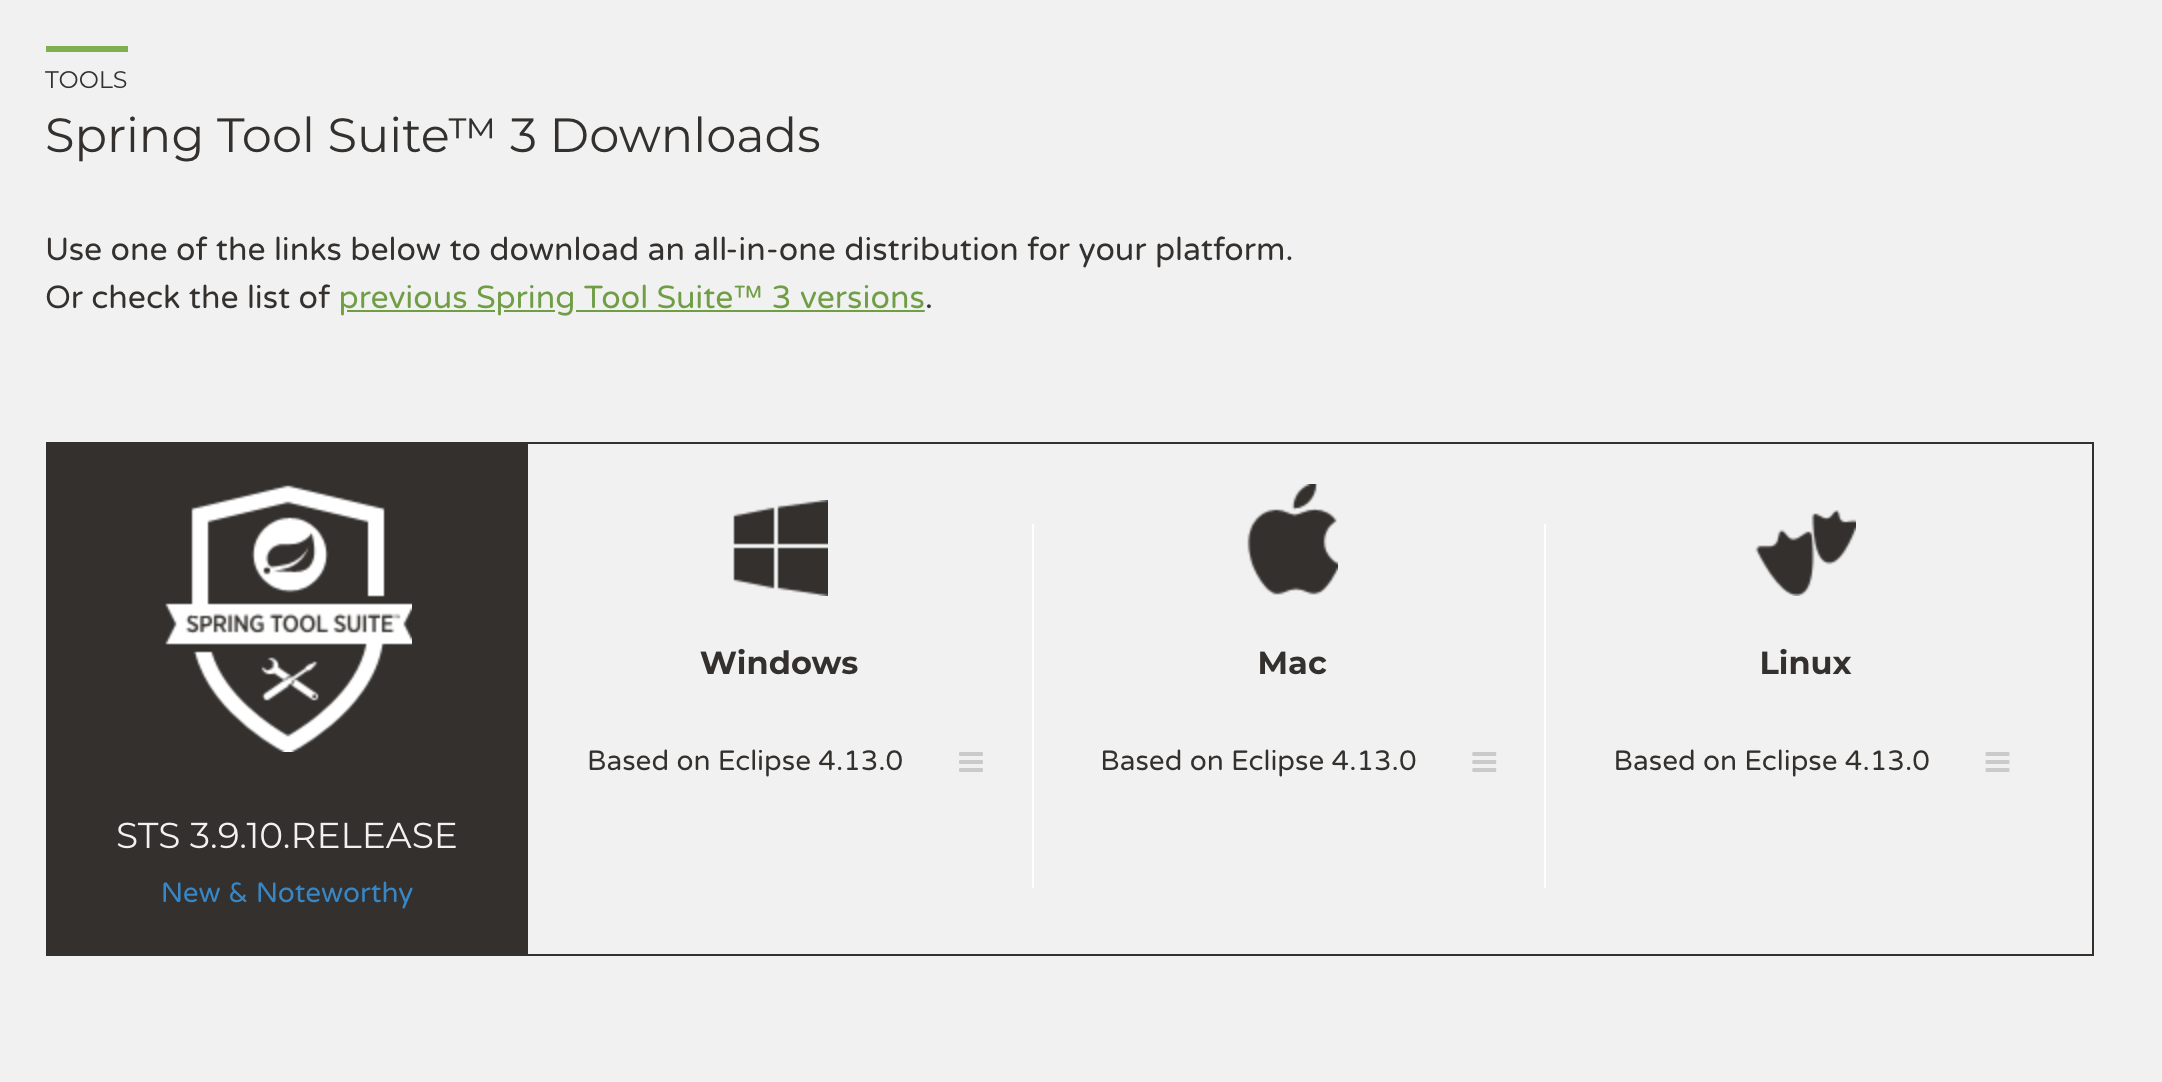
・ STS 다운받기
https://spring.io/tools3/sts/all
Spring Tool Suite™ 3 (STS 3) Download page
Use one of the links below to download an all-in-one distribution for your platform. Choose either a native installer or simple archive, they contain equivalent functionality
spring.io
・ 자신의 운영체제에 맞는 파일을 다운로드.
2. 프로젝트 생성
・ 우클릭- new - spring Starter Project

・Packaging - War 를 선택.

・ web 검색 - Spring Web 선택 - Finish 클릭

・ 생성된 프로젝트 우클릭 - Run As - Spring Boot APP 클릭
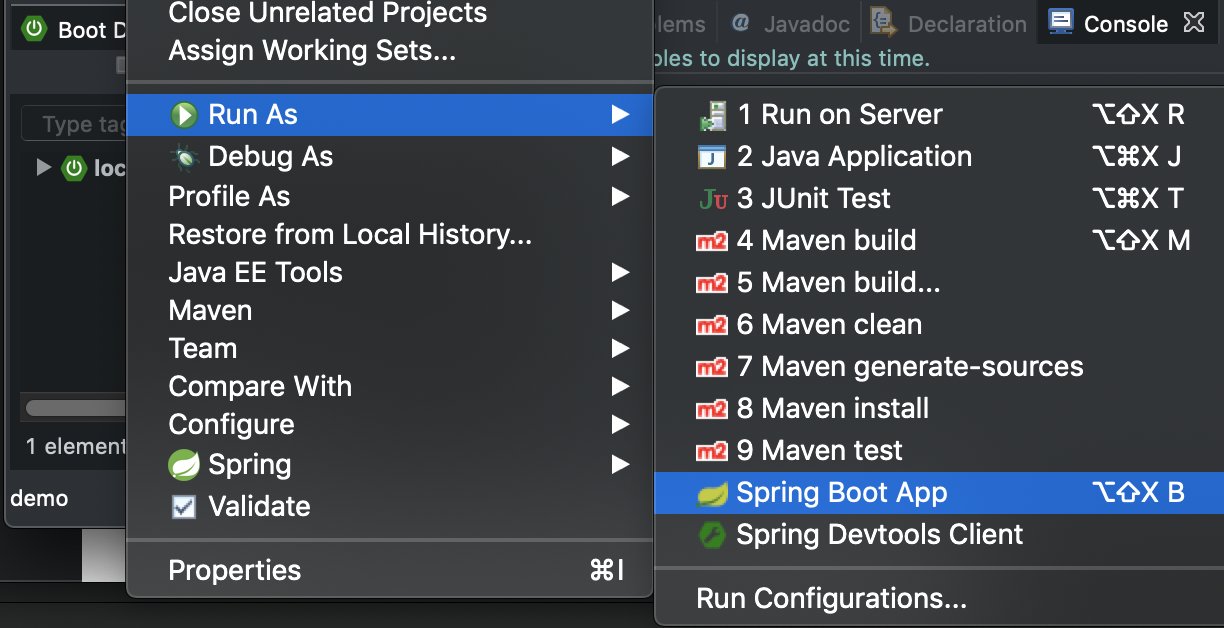
・ 아래와 같이 나오면 성공

3. Pom.xml 파일 설정
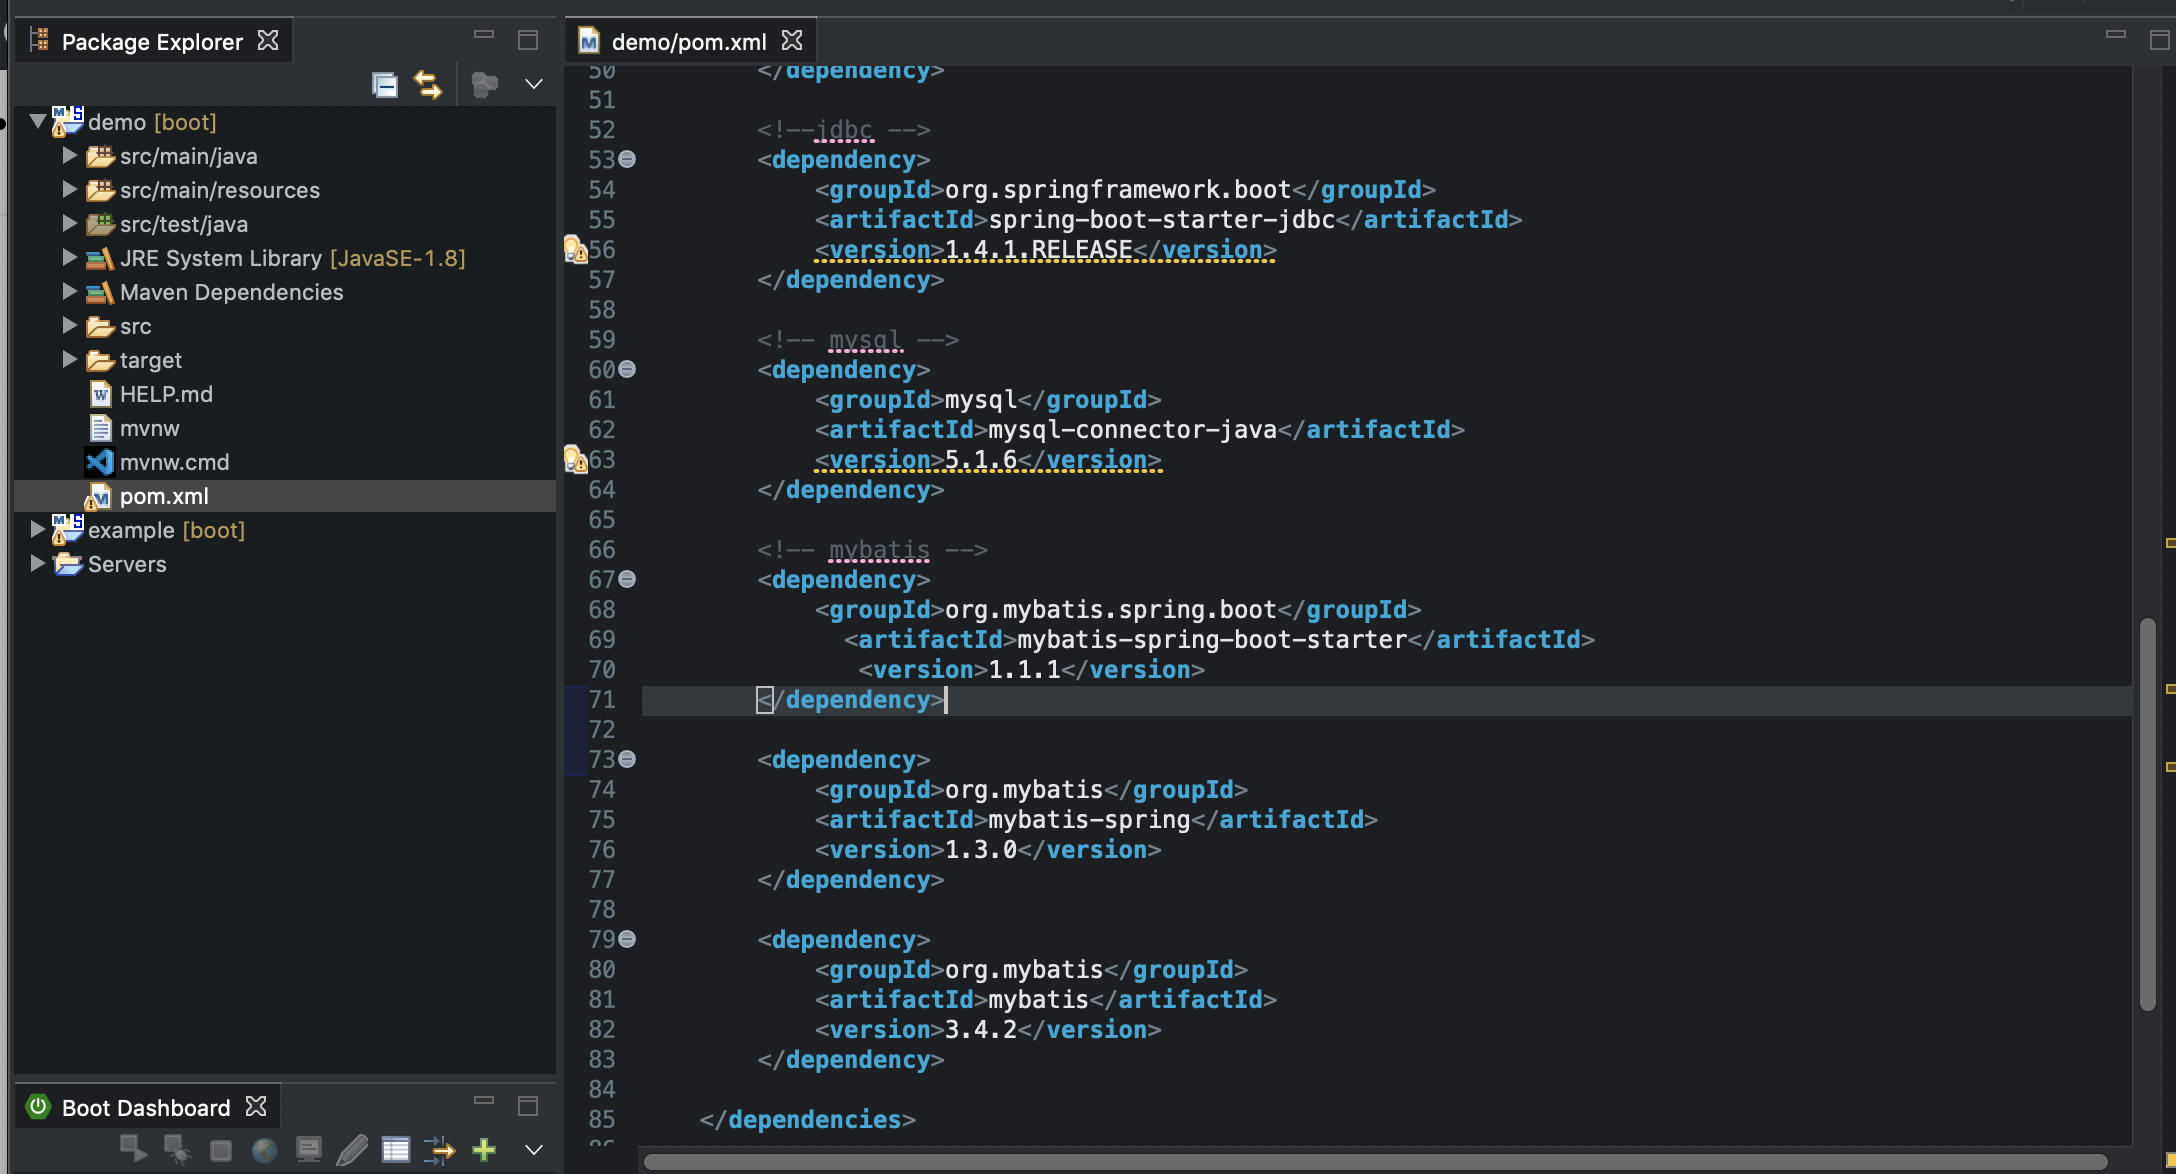
・ dependency 영역에 추가
		<!-- jsp -->
        <dependency>
            <groupId>org.apache.tomcat.embed</groupId>
            <artifactId>tomcat-embed-jasper</artifactId>
            <version>8.0.36</version>
        </dependency>

        <dependency>
            <groupId>javax.servlet.jsp.jstl</groupId>
            <artifactId>javax.servlet.jsp.jstl-api</artifactId>
            <version>1.2.1</version>
        </dependency>

        <!--jdbc -->
        <dependency>
            <groupId>org.springframework.boot</groupId>
            <artifactId>spring-boot-starter-jdbc</artifactId>
            <version>1.4.1.RELEASE</version>
        </dependency>

        <!-- mysql -->
        <dependency>
            <groupId>mysql</groupId>
            <artifactId>mysql-connector-java</artifactId>
            <version>5.1.6</version>
        </dependency>

        <!-- mybatis -->
        <dependency>
            <groupId>org.mybatis.spring.boot</groupId>
              <artifactId>mybatis-spring-boot-starter</artifactId>
               <version>1.1.1</version>
        </dependency>

        <dependency>
            <groupId>org.mybatis</groupId>
            <artifactId>mybatis-spring</artifactId>
            <version>1.3.0</version>
        </dependency>

        <dependency>
            <groupId>org.mybatis</groupId>
            <artifactId>mybatis</artifactId>
            <version>3.4.2</version>
        </dependency>
오라클의 경우
 <!— mysql
        <dependency>
            <groupId>mysql</groupId>
            <artifactId>mysql-connector-java</artifactId>
            <version>5.1.6</version>
        </dependency>
  대신에 아래 추가 —>

  <!— oracle   —>
  <dependency>
        <groupId>com.oracle</groupId>
        <artifactId>ojdbc6</artifactId>
        <version>11.1.0.7.0</version>
    </dependency>
・ 프로젝트 우클릭 - Maven - Update Project 클릭

・ 프로젝트 선택 - OK 클릭

4. 데이터베이스 설정
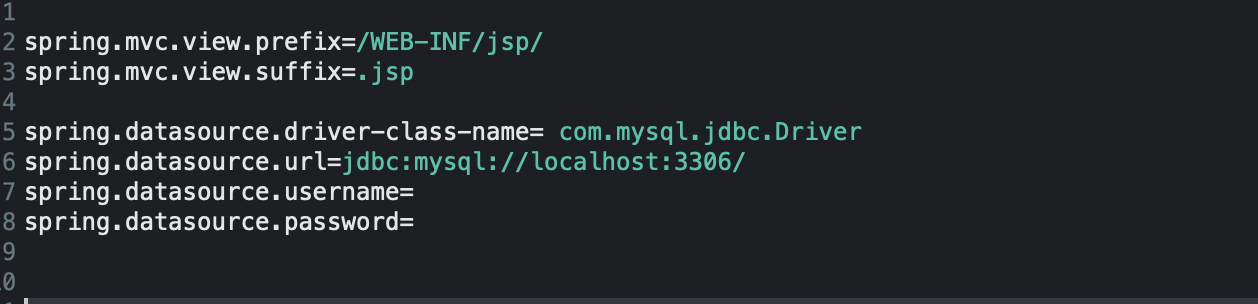
・ scr/main/resources - application.properties
spring.mvc.view.prefix=/WEB-INF/jsp/
spring.mvc.view.suffix=.jsp

spring.datasource.driver-class-name= com.mysql.jdbc.Driver
spring.datasource.url=jdbc:mysql://localhost:3306/스키마
spring.datasource.username= 로그인 아이디
spring.datasource.password= 로그인 패스워드
spring.mvc.view.prefix=/WEB-INF/views/ 는 jsp파일 경로 지정입니다
5. 화면 연결 테스트
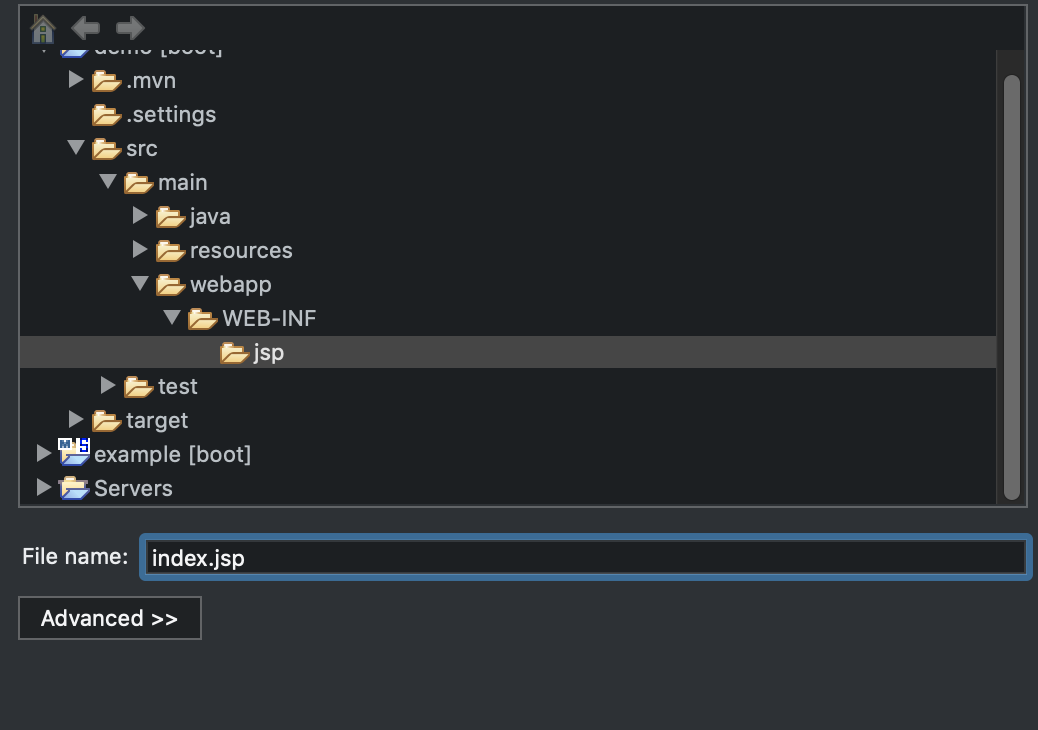
・ 폴더 생성 및 파일 생성( webapp - WEB-INF - jsp - index.jsp)
・ 화면 테스트 코드 설정

・ index.java 생성 후 iController 설정

package com.example.demo;

import org.springframework.stereotype.Controller;
import org.springframework.web.bind.annotation.RequestMapping;

@Controller
public class index {

	@RequestMapping("/index")
	private String indexMain() {

		return "index";
	}
}
6. 화면 연결 확인

・ 아래 주소로 접속 후 화면 확인

'개발 > java' 카테고리의 다른 글
| [java] springBoot + mybatis + mysql 게시판 read기능 (0) | 2019.10.27 |
|---|---|
| [java] springBoot + mybatis + mysql 게시판 환경설정(2) (0) | 2019.10.24 |
| [자료구조] java stack 구현하기 (2) (0) | 2019.03.10 |
| [자료구조] java stack 정리 (1) (0) | 2019.03.10 |
| [Java]ArrayLiist와 LinkedList 의 차이 (0) | 2019.01.09 |

